Installing Microsoft Exchange Server 2019 might seem daunting, but by following a step-by-step approach, you can simplify the process. Using the command line for this installation offers several advantages, including greater flexibility and the ability to automate certain tasks. In this guide, we will show you how to install Exchange Server 2019 using PowerShell commands, ensuring that each step is clearly explained for ease of understanding.
Whether you are an experienced system administrator or new to Exchange Server, this guide will provide you with the necessary instructions to successfully complete your installation. We will cover the prerequisites, environment preparation, the actual installation, and post-installation configurations. Get ready to dive into the world of Exchange administration with confidence and efficiency!
Install Exchange Mailbox server prerequisites :
Follow the steps below to install Exchange Mailbox server prerequisites for Windows Server.
Step 1. Run PowerShell as administrator. Run the following command to install the required Windows components.
Install-WindowsFeature Server-Media-Foundation, NET-Framework-45-Core, NET-Framework-45-ASPNET, NET-WCF-HTTP-Activation45, NET-WCF-Pipe-Activation45, NET-WCF-TCP-Activation45, NET-WCF-TCP-PortSharing45, RPC-over-HTTP-proxy, RSAT-Clustering, RSAT-Clustering-CmdInterface, RSAT-Clustering-Mgmt, RSAT-Clustering-PowerShell, WAS-Process-Model, Web-Asp-Net45, Web-Basic-Auth, Web-Client-Auth, Web-Digest-Auth, Web-Dir-Browsing, Web-Dyn-Compression, Web-Http-Errors, Web-Http-Logging, Web-Http-Redirect, Web-Http-Tracing, Web-ISAPI-Ext, Web-ISAPI-Filter, Web-Metabase, Web-Mgmt-Console, Web-Mgmt-Service, Web-Net-Ext45, Web-Request-Monitor, Web-Server, Web-Stat-Compression, Web-Static-Content, Web-Windows-Auth, Web-WMI, Windows-Identity-Foundation, RSAT-ADDS


Before diving into the installation of Exchange Server 2019, it’s crucial to ensure that all prerequisites are met. This includes installing necessary software and components, which can be downloaded from the provided links. In this guide, we will focus on using the command line to install these prerequisites, streamlining the process and making it more efficient.
Step 2. Install Visual C++ Redistributable for Visual Studio 2012.
Step 3. Install Visual C++ Redistributable Packages for Visual Studio 2013.
Update for Visual C++ 2013 Redistributable Package – Microsoft Support
Step 4. Install IIS URL Rewrite Module.
URL Rewrite : The Official Microsoft IIS Site
Note: The IIS URL Rewrite Module is required with Exchange Server 2016 CU22 and Exchange Server 2019 CU11 or later.
Step 5. Install Unified Communications Managed API 4.0 Runtime.
Download Unified Communications Managed API 4.0 Runtime from Official Microsoft Download Center

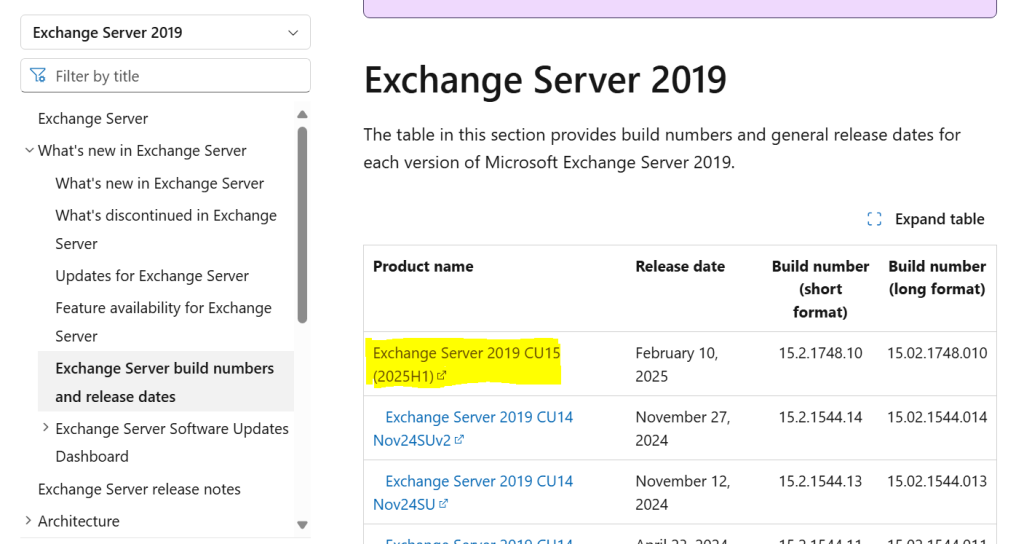
To download Exchange Server, you need to visit the Exchange Server build numbers and release dates page. This page provides a comprehensive list of all Exchange Server build numbers and their respective release dates. It is an essential resource for ensuring you have the correct version and updates for your installation.
You can access the page here: Exchange Server build numbers and release dates.
In our case, we will be installing Exchange Server 2019 CU15, the latest version of Exchange Server as of this date. Exchange Server build numbers and release dates | Microsoft Learn This page will guide you through the available builds, helping you to download the appropriate version for your needs. Make sure to check this page regularly for the latest updates and releases
Verify Account Access
Before extending the schema, ensure your account is a member of the Schema Admins and Enterprise Admins security groups. To do this, open Active Directory and add these groups to your account if they are not already included. These groups have high privileges, so it is recommended to remove your account from them once you have completed this task.
				Add-ADGroupMember -Identity "Schema admins" -Members "RootMBX"
Add-ADGroupMember -Identity "Enterprise admins" -Members "RootMBX"

prepare AD Schéma
The initial step in preparing your organization for Exchange Server involves extending the Active Directory schema. Since Exchange stores a significant amount of data in Active Directory, it must first update or add new classes and attributes.
To begin, open File Explorer, right-click on the Exchange Server CU ISO image file, and choose “Mount.” This action will mount the ISO image to a drive, such as the E:\ drive, which contains the Exchange installation files. Ensure that the Exchange ISO image is mounted before moving on to the next step.

Run Command Prompt as administrator. Run the following command to extend/prepare the schema for Exchange Server
E:\Setup.exe /IAcceptExchangeServerLicenseTerms_DiagnosticDataOFF /PrepareSchema

You will see the COMPLETED messages in the output. The extend/prepare schema for Exchange Server went successfully.
Prepare Active Directory
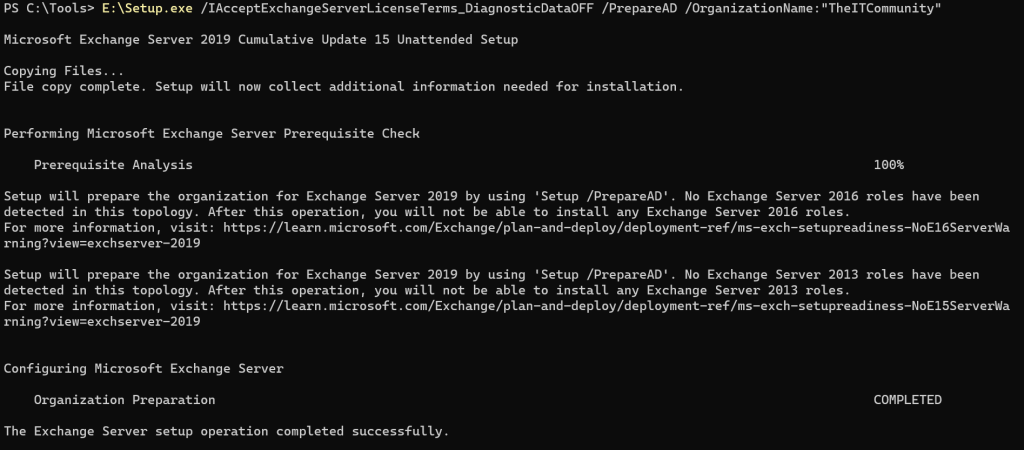
Once the Active Directory schema has been extended, the next step is to prepare other aspects of Active Directory for Exchange Server. During this process, Exchange will create various containers, objects, and other elements within Active Directory to store necessary information. This set of containers, objects, attributes, and related components is referred to as the Exchange organization.
NB : If you already have an Exchange Server installed, you do not need to specify the OrganizationName.
E:\Setup.exe /IAcceptExchangeServerLicenseTerms_DiagnosticDataOFF /PrepareAD /OrganizationName:"TheITCommunity"
Prepare Active Directory Domains
The final step in preparing Active Directory for Exchange is to configure each of the domains where Exchange will be installed. This process involves creating additional containers, security groups, and setting permissions to ensure that Exchange can access them properly.
E:\Setup.exe /IAcceptExchangeServerLicenseTerms_DiagnosticDataOFF /PrepareAllDomains

install Exchange
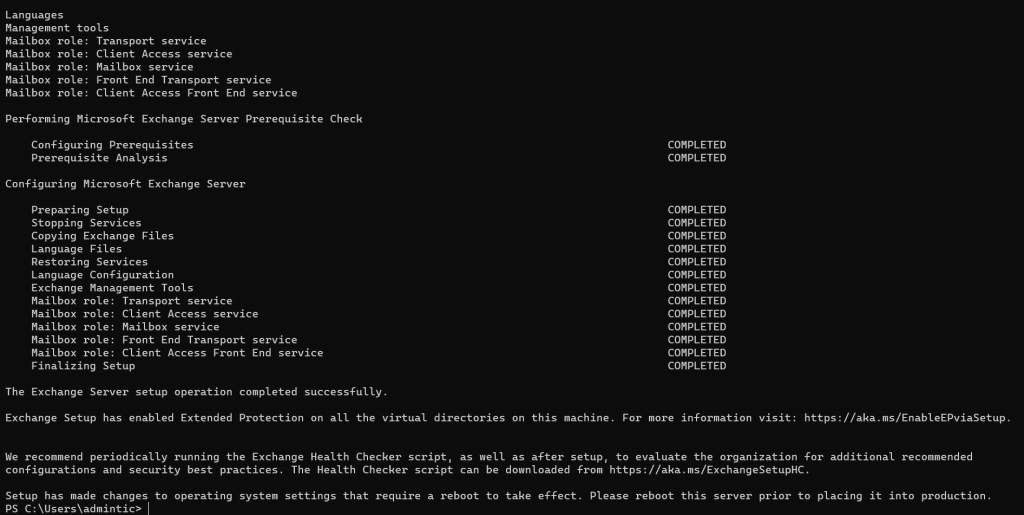
Run Command Prompt as administrator. Install the Mailbox Server Role and the management tools in the default folder on the local server.
E:\Setup.exe /IAcceptExchangeServerLicenseTerms_DiagnosticDataOFF /mode:Install /r:MB
Post-Installation Steps
Once the installation is complete, restart the Exchange Server. After the restart, connect to the Exchange Management Shell and verify that all services are running properly.
				Test-ServiceHealth

Role                    : Mailbox Server Role
RequiredServicesRunning : True
ServicesRunning         : {IISAdmin, MSExchangeADTopology, MSExchangeDelivery, MSExchangeIS, MSExchangeMailboxAssistants, MSExchangeRepl, MSExchangeRPC,
                          MSExchangeServiceHost, MSExchangeSubmission, MSExchangeThrottling, MSExchangeTransportLogSearch, W3Svc, WinRM}
ServicesNotRunning      : {}

Role                    : Client Access Server Role
RequiredServicesRunning : True


ServicesRunning         : {IISAdmin, MSExchangeADTopology, MSExchangeMailboxReplication, MSExchangeRPC, MSExchangeServiceHost, W3Svc, WinRM}
ServicesNotRunning      : {}

Role                    : Hub Transport Server Role
RequiredServicesRunning : True
ServicesRunning         : {IISAdmin, MSExchangeADTopology, MSExchangeEdgeSync, MSExchangeServiceHost, MSExchangeTransport, MSExchangeTransportLogSearch,
                          W3Svc, WinRM}
ServicesNotRunning      : {}

Configure Exchange Virtual Directory
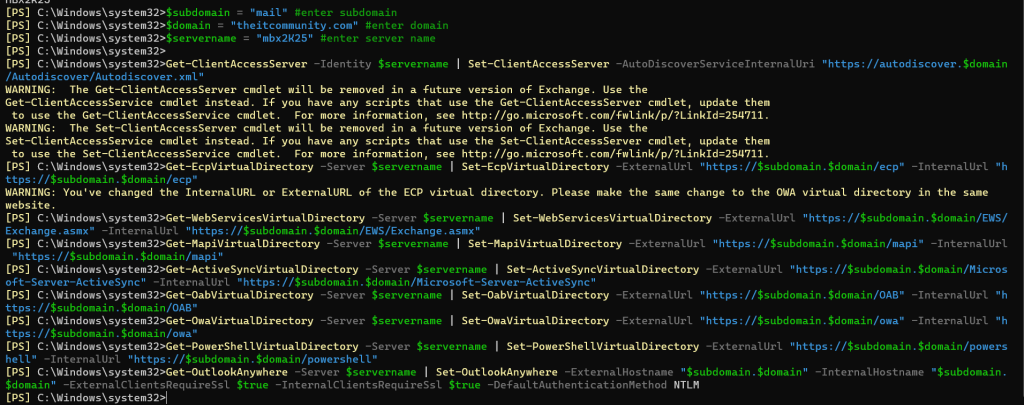
After installing Exchange Server and setting up the internal DNS, the next step is to configure the internal and external URLs for Exchange Server. This can be accomplished using either the Exchange Admin Center (EAC) or PowerShell. While most settings can be configured through the EAC, the AutoDiscover service must be configured using PowerShell. In this guide, you will learn how to configure these URLs in Exchange Server.
				$subdomain = "mail" #enter subdomain
$domain = "theitcommunity.com" #enter domain
$servername = "mbx2K25" #enter server name

Get-ClientAccessServer -Identity $servername | Set-ClientAccessServer -AutoDiscoverServiceInternalUri "https://autodiscover.$domain/Autodiscover/Autodiscover.xml"
Get-EcpVirtualDirectory -Server $servername | Set-EcpVirtualDirectory -ExternalUrl "https://$subdomain.$domain/ecp" -InternalUrl "https://$subdomain.$domain/ecp"
Get-WebServicesVirtualDirectory -Server $servername | Set-WebServicesVirtualDirectory -ExternalUrl "https://$subdomain.$domain/EWS/Exchange.asmx" -InternalUrl "https://$subdomain.$domain/EWS/Exchange.asmx"
Get-MapiVirtualDirectory -Server $servername | Set-MapiVirtualDirectory -ExternalUrl "https://$subdomain.$domain/mapi" -InternalUrl "https://$subdomain.$domain/mapi"
Get-ActiveSyncVirtualDirectory -Server $servername | Set-ActiveSyncVirtualDirectory -ExternalUrl "https://$subdomain.$domain/Microsoft-Server-ActiveSync" -InternalUrl "https://$subdomain.$domain/Microsoft-Server-ActiveSync"
Get-OabVirtualDirectory -Server $servername | Set-OabVirtualDirectory -ExternalUrl "https://$subdomain.$domain/OAB" -InternalUrl "https://$subdomain.$domain/OAB"
Get-OwaVirtualDirectory -Server $servername | Set-OwaVirtualDirectory -ExternalUrl "https://$subdomain.$domain/owa" -InternalUrl "https://$subdomain.$domain/owa"
Get-PowerShellVirtualDirectory -Server $servername | Set-PowerShellVirtualDirectory -ExternalUrl "https://$subdomain.$domain/powershell" -InternalUrl "https://$subdomain.$domain/powershell"
Get-OutlookAnywhere -Server $servername | Set-OutlookAnywhere -ExternalHostname "$subdomain.$domain" -InternalHostname "$subdomain.$domain" -ExternalClientsRequireSsl $true -InternalClientsRequireSsl $true -DefaultAuthenticationMethod NTLM
Enable MRS Proxy
The Mailbox Replication Service (MRS) Proxy is essential for facilitating cross-forest mailbox moves and remote move migrations between your on-premises Exchange organization and Microsoft 365 or Office 365. To enable the MRS Proxy endpoint, you need to configure the Exchange Web Services (EWS) virtual directory settings on your Exchange 2019 Mailbox servers.
Set-WebServicesVirtualDirectory -Identity "mbx2K25\EWS (Default Web Site)" -MRSProxyEnabled $true

Create Internet Send Connector
Creating a Send Connector in Exchange Using PowerShell
To set up a send connector in Exchange Server through PowerShell, follow the steps outlined below:
New-SendConnector -Name "To Internet" -Usage "Internet" -SourceTransportServers "mbx2K25" -AddressSpaces ("SMTP:*;1") -IsScopedConnector $False -UseExternalDNSServersEnabled $false

Disk and Partition Configuration for Exchange Server
When configuring disks and partitions for Exchange Server, it is recommended to use the Resilient File System (ReFS) format for the database volumes. ReFS provides enhanced data integrity, performance, and scalability, making it ideal for Exchange Server databases.
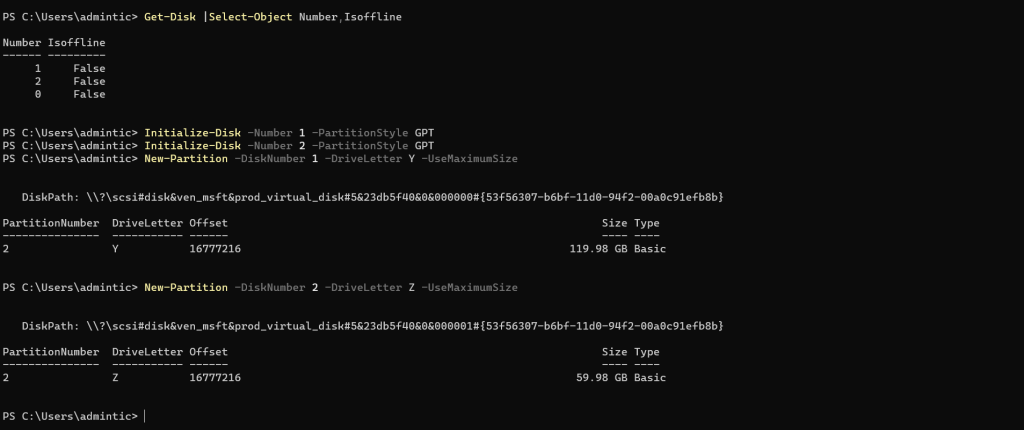
To configure disks and partitions for Exchange Server, you can use the following PowerShell commands. These commands will help you format the disks with the Resilient File System (ReFS) and set up the necessary partitions:
Initialize the Disk:
				Get-Disk |Select-Object Number,Isoffline
Initialize-Disk -Number 1 -PartitionStyle GPT
Initialize-Disk -Number 2 -PartitionStyle GPT
Create a New Partition:
				New-Partition -DiskNumber 1 -DriveLetter Y -UseMaximumSize
New-Partition -DiskNumber 2 -DriveLetter Z -UseMaximumSize
Format the Partition with ReFS:
				Format-Volume -DriveLetter Y -FileSystem Refs -NewFriendlyName DATA
Format-Volume -DriveLetter Z -FileSystem Refs -NewFriendlyName Log

Move and Rename Default Exchange Database to Another Drive
To move and rename the default Exchange database to another drive, follow these steps:
Move the Database and Log Files
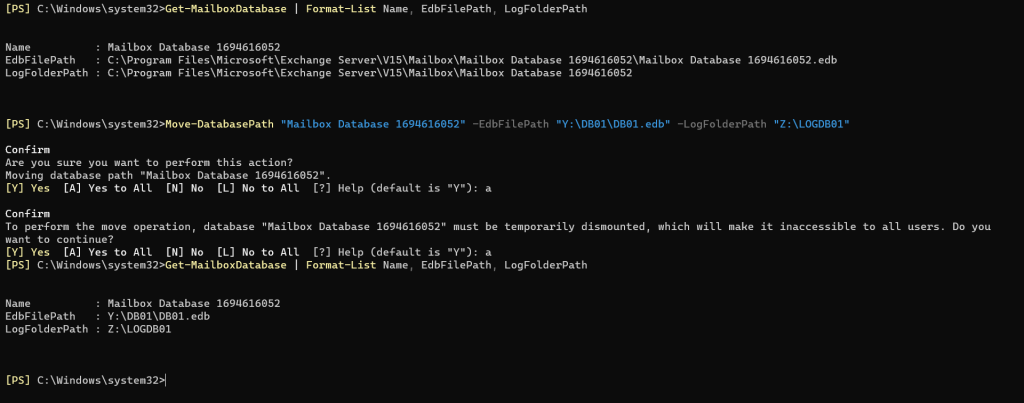
				Get-MailboxDatabase | Format-List Name, EdbFilePath, LogFolderPath
Move-DatabasePath "Mailbox Database 1694616052" -EdbFilePath "Y:\DB01\DB01.edb" -LogFolderPath "Z:\LOGDB01"
Rename the Database: Optionally, rename the database to a more meaningful name:
				Set-MailboxDatabase -Identity "Mailbox Database 1694616052"  -Name "DB01"
Get-MailboxDatabase

“We are waiting for your comment.”
“Welcome to your community!”

